


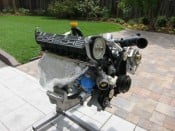
944 Water Pump Thread Repair
-
Tom

- Site Admin
- Posts: 9098
- Joined: Fri Jun 25, 2021 2:04 pm
- Location: Silicon Valley, CA
- Has thanked: 952 times
- Been thanked: 4085 times
- Contact:
-
four0four
- Posts: 185
- Joined: Wed Feb 02, 2022 10:09 pm
- Location: Western WA
- Has thanked: 22 times
- Been thanked: 32 times
Gah, I wish I'd thought of this last winter! Makes me want to re-do that work with inserts and this jig...That way I wouldn't have to modify pumps!
What print settings did you use? I imagine it doesn't need to be super overbuilt...
What print settings did you use? I imagine it doesn't need to be super overbuilt...
-
Tom
- Site Admin
- Posts: 9098
- Joined: Fri Jun 25, 2021 2:04 pm
- Location: Silicon Valley, CA
- Has thanked: 952 times
- Been thanked: 4085 times
- Contact:
I printed it using default CURA settings for ABS (.35mm layer height), but you could print it in just about anything and be fine. No support needed, and no fine details to worry about. As long as your printer is dimensionally accurate, that's all that really matters. (I can print them for Carpokeans who need help too.) You can JB weld the bushings in if they are tight, but I didn't need to on this one...
That RL picture is hard to look at and kind of the extreme reason I opted to make this fixture. With this fixture, you really can't get it wrong. I'd say to post a link to this in that thread to help others, but last I checked RL was still redacting all references to carpokes, so you'd need to post the youtube video or get creative with the link, etc.
-
four0four
- Posts: 185
- Joined: Wed Feb 02, 2022 10:09 pm
- Location: Western WA
- Has thanked: 22 times
- Been thanked: 32 times
Yeah, it was a little rough. I think I'd have been fine and able to center it w/my jig if some PO hadn't helpfully started a hole just off the side of the stud.
Heh, and as far as RL goes: you could probably get away with a redirect, but I'll drop your video in there
re: print settings - perfect, I just got ABS working like a charm, too!
edit: fwiw, this just barely fits in an Ender 3. Had to put it at a funky angle.
Heh, and as far as RL goes: you could probably get away with a redirect, but I'll drop your video in there
re: print settings - perfect, I just got ABS working like a charm, too!
edit: fwiw, this just barely fits in an Ender 3. Had to put it at a funky angle.
-
Tom
- Site Admin
- Posts: 9098
- Joined: Fri Jun 25, 2021 2:04 pm
- Location: Silicon Valley, CA
- Has thanked: 952 times
- Been thanked: 4085 times
- Contact:
four0four wrote: Sun Apr 03, 2022 7:45 pm Yeah, it was a little rough. I think I'd have been fine and able to center it w/my jig if some PO hadn't helpfully started a hole just off the side of the stud.
Heh, and as far as RL goes: you could probably get away with a redirect, but I'll drop your video in there
re: print settings - perfect, I just got ABS working like a charm, too!
edit: fwiw, this just barely fits in an Ender 3. Had to put it at a funky angle.
I'll split it into 2 halves and post a left and right to make it easier to print on smaller print beds. As long as there are 4 or 5 holes to line it all up, it should work fine....
-
four0four
- Posts: 185
- Joined: Wed Feb 02, 2022 10:09 pm
- Location: Western WA
- Has thanked: 22 times
- Been thanked: 32 times
Some holes for locating pins along the face of the split might be welcome, in case there aren't!
(bah, went to print it yesterday just to have on hand...warped right off. oh well!)
(bah, went to print it yesterday just to have on hand...warped right off. oh well!)
-
Tom
- Site Admin
- Posts: 9098
- Joined: Fri Jun 25, 2021 2:04 pm
- Location: Silicon Valley, CA
- Has thanked: 952 times
- Been thanked: 4085 times
- Contact:
I just posted the left and right-side models. They don't fit together, but rather are intended to be used independenly. Depending on which hole you need to fix, you'd just put the appropriate side jig on to fix that hole. I could have just cut it down the middle and added locating pins, etc., but there's no particular point in using both halves to fix any particular hole, and this way I was able to round off the corners to further reduce the chance of warping. Between that and the smaller size, you should be able to avoid warping, even with ABS. For me, an elmers glue stick, hot print bed with PEI, a super tight z-offset, printer enclosure warmed up to 80+F, and a big brim, all combined to avoid warping when printing the full jig in ABS.... But the jig would be just as good in PLA or other easy-printing materials....four0four wrote: Mon Apr 04, 2022 9:33 am Some holes for locating pins along the face of the split might be welcome, in case there aren't!
(bah, went to print it yesterday just to have on hand...warped right off. oh well!)
-
dr bob
- Moderator
- Posts: 651
- Joined: Thu Jul 08, 2021 9:30 pm
- Location: Central Oregon
- Has thanked: 264 times
- Been thanked: 259 times
Love the fix!
Any inspiration to heat-cycling the rest of the studs (MAPP gas torch springs to mind) and extracting them now? The next one won't break until you have the engine installed, per my longtime spiritual and vocabulary advisor Dr. Edsel Murphy.
Any inspiration to heat-cycling the rest of the studs (MAPP gas torch springs to mind) and extracting them now? The next one won't break until you have the engine installed, per my longtime spiritual and vocabulary advisor Dr. Edsel Murphy.
dr bob
1989 928 S4, black with cashmere/black inside
SoCal 928 Group Cofounder
928 Owner's Club Charter Member
Former Ex Bend Yacht Club Commodore Emeritus
Free Advice and Commentary. Use At Your Own Risk!
1989 928 S4, black with cashmere/black inside
SoCal 928 Group Cofounder
928 Owner's Club Charter Member
Former Ex Bend Yacht Club Commodore Emeritus
Free Advice and Commentary. Use At Your Own Risk!
-
Tom
- Site Admin
- Posts: 9098
- Joined: Fri Jun 25, 2021 2:04 pm
- Location: Silicon Valley, CA
- Has thanked: 952 times
- Been thanked: 4085 times
- Contact:
That was an old engine I used as a proof of concept and demo for the tool. A friend of mine once had to do it free-hand with the motor in the car many years ago, and I've been plotting to make this tool every since. Originally, it was going to be a steel fixture but now with 3D printers, the tool is just one download away.dr bob wrote: Tue Apr 05, 2022 12:14 pm Love the fix!
Any inspiration to heat-cycling the rest of the studs (MAPP gas torch springs to mind) and extracting them now? The next one won't break until you have the engine installed, per my longtime spiritual and vocabulary advisor Dr. Edsel Murphy.