So that no one needs to leave the safe and cozy confines of Carpokes, here is my to-the-point summary of installing the Nissan alternator. The other sites have super long threads, which do contain all the info needed, but it's spread out over dozens of pages with lots of old/dead links... Just say'n.
 Overview
: The basic idea is to replace the stock alternator with the alternator from a Nissan Quest. This is a more traditional looking alternator and, importantly, gives you room for bigger turbos, MAF pipes, etc. In order to make it fit, you need to grind both the alternator case and the alternator mount. When grinding the alternator, either disassemble it so you can grind the case without getting metal shavings inside, or carefully mask off the case so nothing can get in there. And wear goggles, trust me on that.
 Alternator
: 1998 Nissan Quest sold with 6-rib pulley (in lieu of original pulley that comes with alternator – i.e., don’t expect an alternator from your local parts store to have the right pulley). You need to request this pulley when ordering. While the eBay guy linked below was very helpful and tried to make everything right, I had 2 or 3 of his alternators go bad in very short order, so ended up putting his pulley on a high-end rebuild from a local auto parts place. When I took the case off to grind it, the difference was day and night. The good one had all-new innards, whereas the eBay one looked old inside with a few fresh parts added. Your results may vary.
https://www.ebay.com/itm/273037406072?h ... R8KilLiTYQ
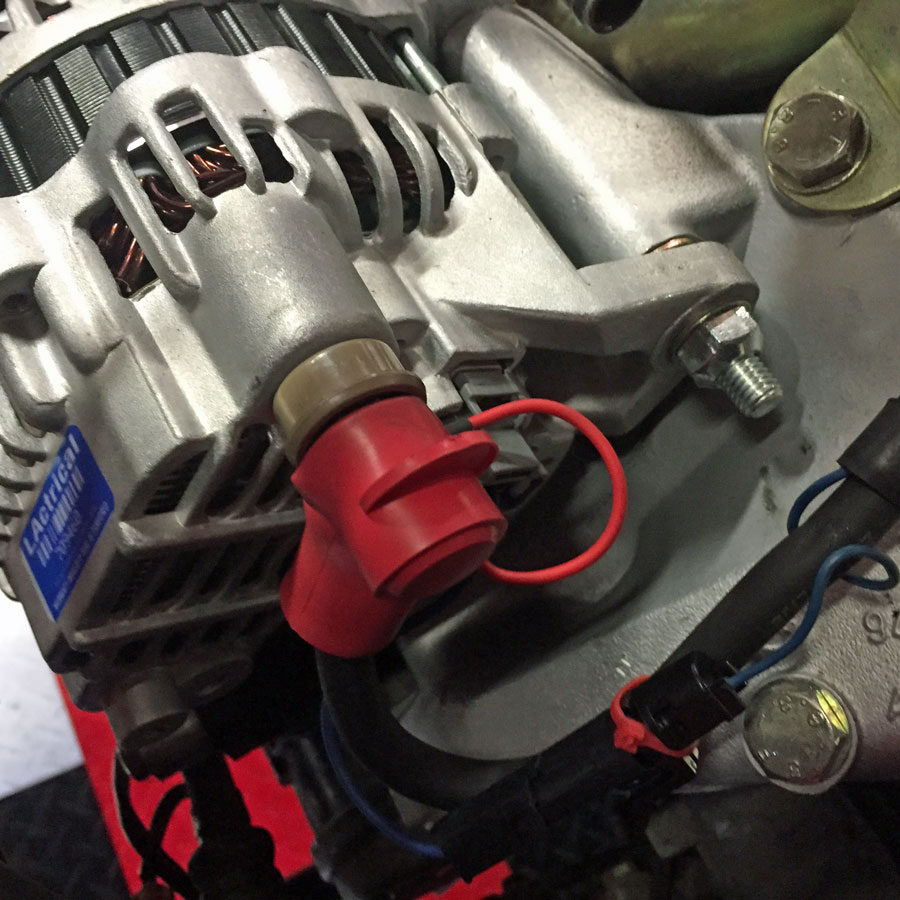
Electrical Jumper for alternator: Part # C1900. I terminated the wires with a standard WeatherPac and eye-ring connectors as shown. (You could also use spade connectors in a pinch.) You can see this in the alternator picture below.
http://store.alternatorparts.com/partnoc1900.aspx
Post Insulator: I found these post insulators at Summit – Ron Francis CC14 post boots. They are an ok fit – way better than not having-- but still on the look-out for something that seals around the alternator post a little better.
http://www.summitracing.com/parts/rfw-cc14
- alternator insulator.jpg (146.93 KiB) Viewed 1783 times
Bolts and nuts: I had to use a 140mm M10 bolt on the pivot mount of the alternator, with a mechanical locknut on the back end. After grinding the tabs, there will be a gap between the pivot ears when you install the alternator and slide the 140mm bolt in place. Be sure to install washers/spacers so that the alternator sits in the bracket fairly tight. I used a thick M10 washer as a shim and ground it a bit thinner as needed so that the alternator was factory-tight in the bracket. Otherwise, the alternator might wander forward/backward and prematurely wear the belt or bearings. I used a 65mm M10 bolt on bottom, also with lock nut. McMaster sell any hardware you might need.
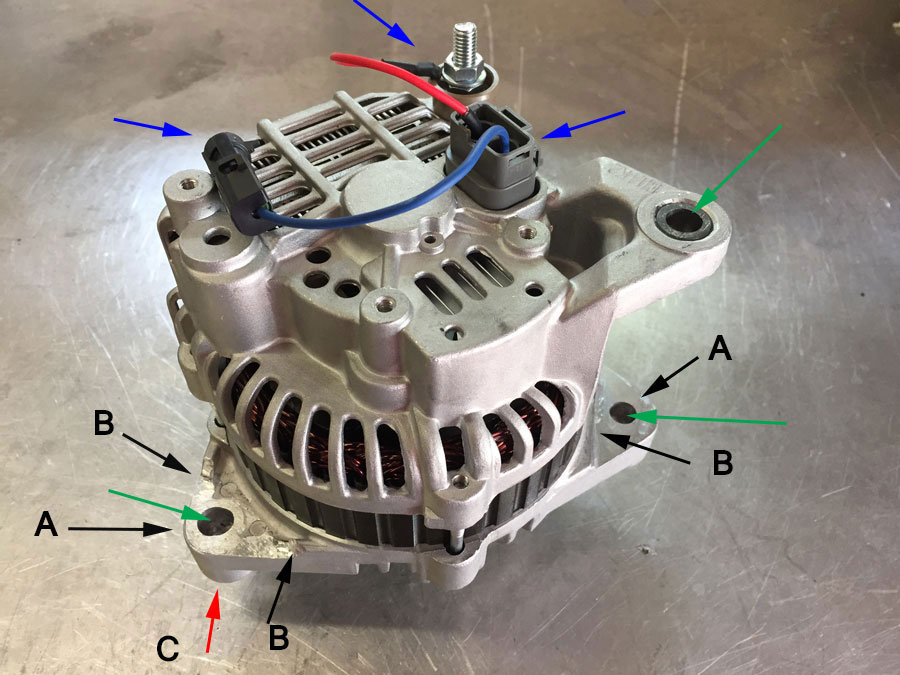
In the picture of the alternator below, the blue arrows show the electrical connections. I used WeatherPac connectors to mate the blue wire in the factory/iceshark harness to the blue wire on the alternator. I added a standard eye-ring connector on the red wire, and adhesive lined heat shrink.
- alternator connections.jpg (119.23 KiB) Viewed 1783 times
The arrows marked A show where I ground down both surfaces so the pulleys all line up. I had to remove just under 6mm from the pivot mount side and about 2mm from the fixed mount side.
The arrows marked B show where I had to grind away material to clear the factory mounting bracket. The red arrow marked C shows where I had to grind about 8mm off the forward face of that mounting tab, to prevent the bolt from hitting the belt that passes right in front of that tab.
The green arrows point to where I drilled the mounting holes. I used a 13/32” on the pivot side (i.e., the closest I had to 10mm) but had to use 7/16” on the fixed mount side in order to get the bolt to slide through.
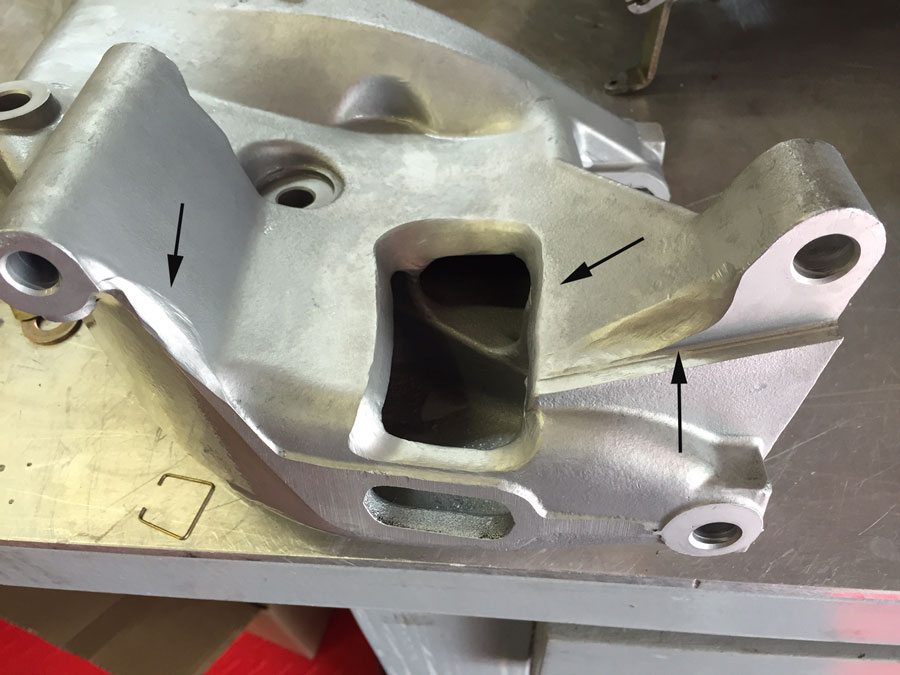
Picture of bracket shows where I ground/cut for the alternator to clear. Grinding the mount and alternator case is by far the biggest part of this job. I did it all with a cheap Harbor Freight side grinder.
- altanator bracket.jpg (95.74 KiB) Viewed 1783 times