


The project I'm currently working on, 71 911
-
Tom

- Site Admin
- Posts: 8939
- Joined: Fri Jun 25, 2021 2:04 pm
- Location: Silicon Valley, CA
- Has thanked: 935 times
- Been thanked: 4006 times
- Contact:
Awesome update. Thanks! In the meantime, I'm still puttering around fixing the same rust spot in my old Mercedes trunk for a month. Got to get back out there.  What do you use to grind the welds down smooth like that?
-
german1985
- Posts: 20
- Joined: Fri Jan 13, 2023 6:08 am
- Location: west GA.
- Has thanked: 9 times
- Been thanked: 5 times
WOW = great looking car !
Best Wishes,
Greg
Best Wishes,
Greg

I use for most of the grinding a small 90 deg air die grinder, 60 grid disc, or angle grinder with flapper wheel. Final cleanup with conditioning discs.
Cheers
Engelbert
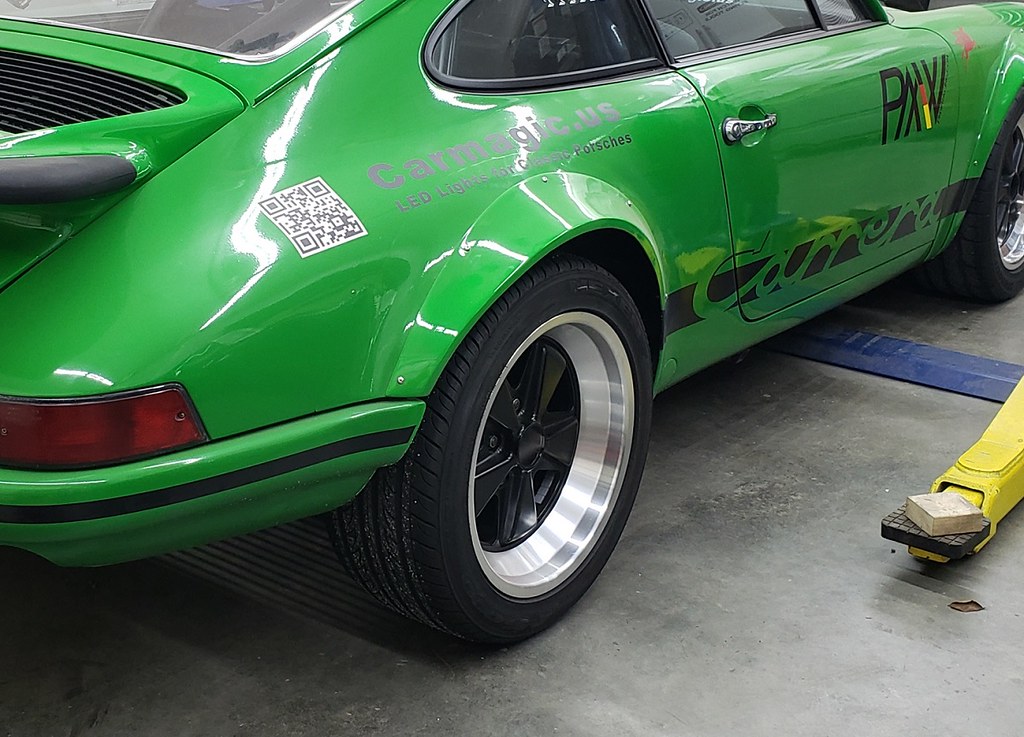
LED lights for classic Porsches http://carmagic.us/
I was waiting for some metal pieces to come in, so I took a look at the fender flares. Since the extensions were added on top of the Carrera flares, I want to make them in one piece.
Here is what the looked like with the extensions.
So I removed the body filler around the flare, and taped the extension on.


Now I can make the plug for the mold.


When I did the left side I found some holes from the past, when somebody did body work.

So I welded the holes and got it straight.


Got the plug almost done.

So, I got back the the sheet metal. I know, back when I build the car for Autocross, nothing was perfect, just a racecar, LOL. So this piece comes out.

I removed careful the rocker.

So there is some work needed.


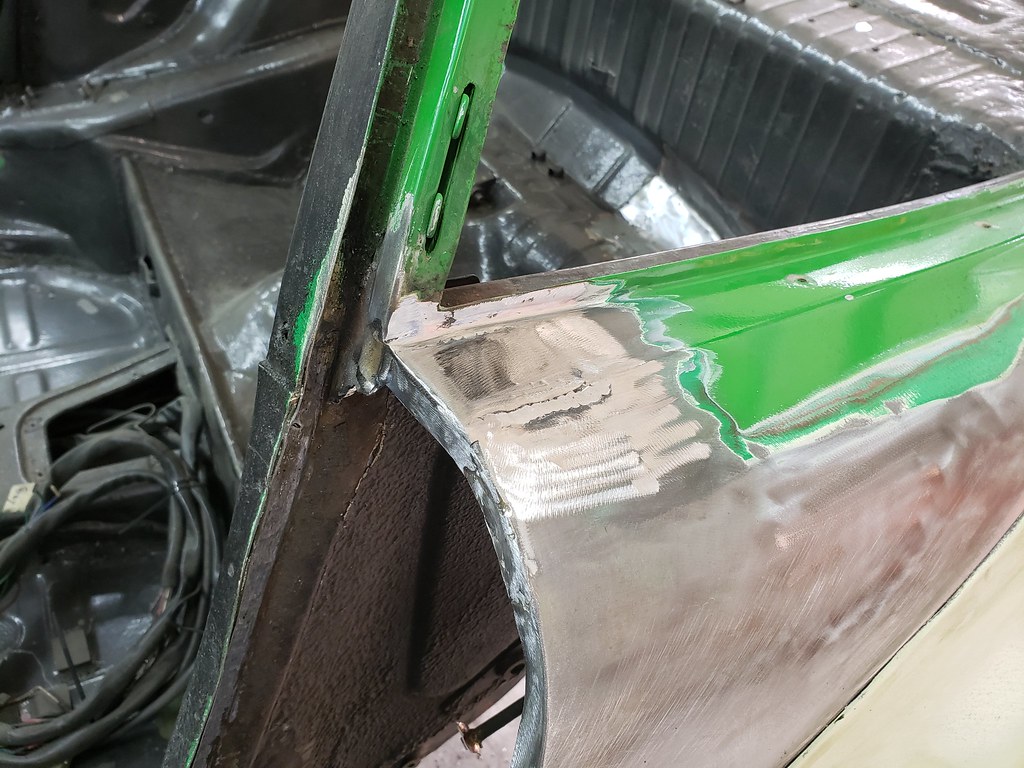
I removed the inner rocker section, this will be replaced with a new piece. Also I get better access to see what's going on in there.

I removed the bottom section of the door post.

As well a section of the inner wall.

Made a new piece and welded it in.

Then I made a new piece for the bottom of the door post.


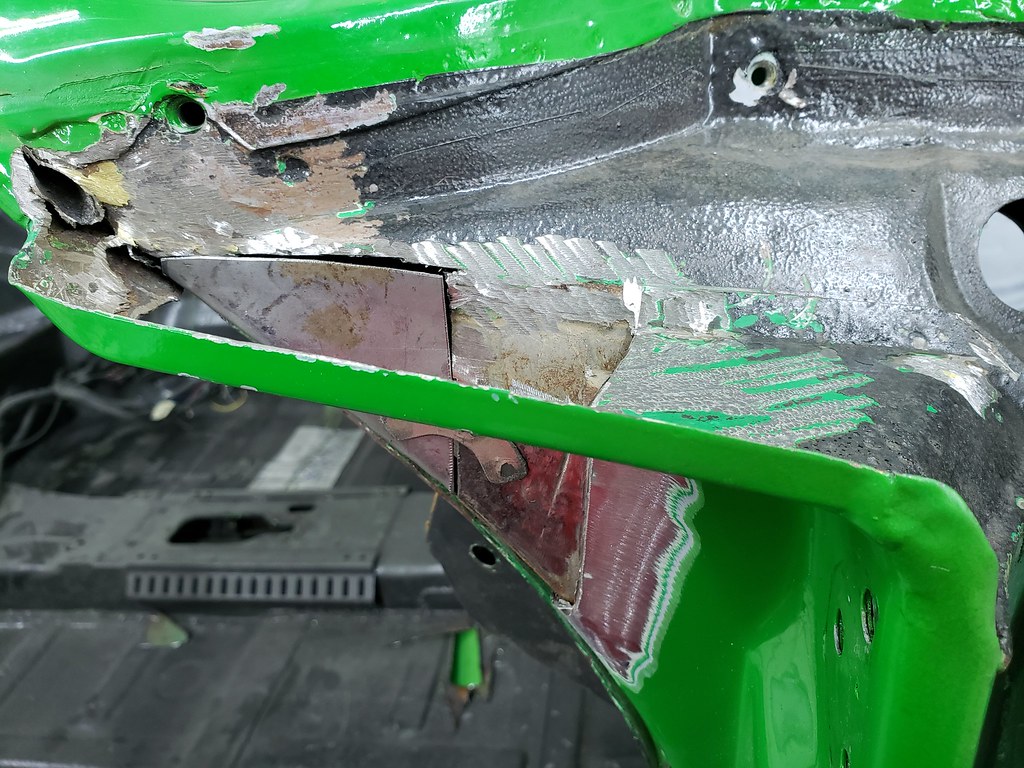
I found some rust at the top section of the door post. So I started to look into that.


And before you know it you are deep in it, LOL.
So I just cut out bad sections, made new pieces and welded it back in.

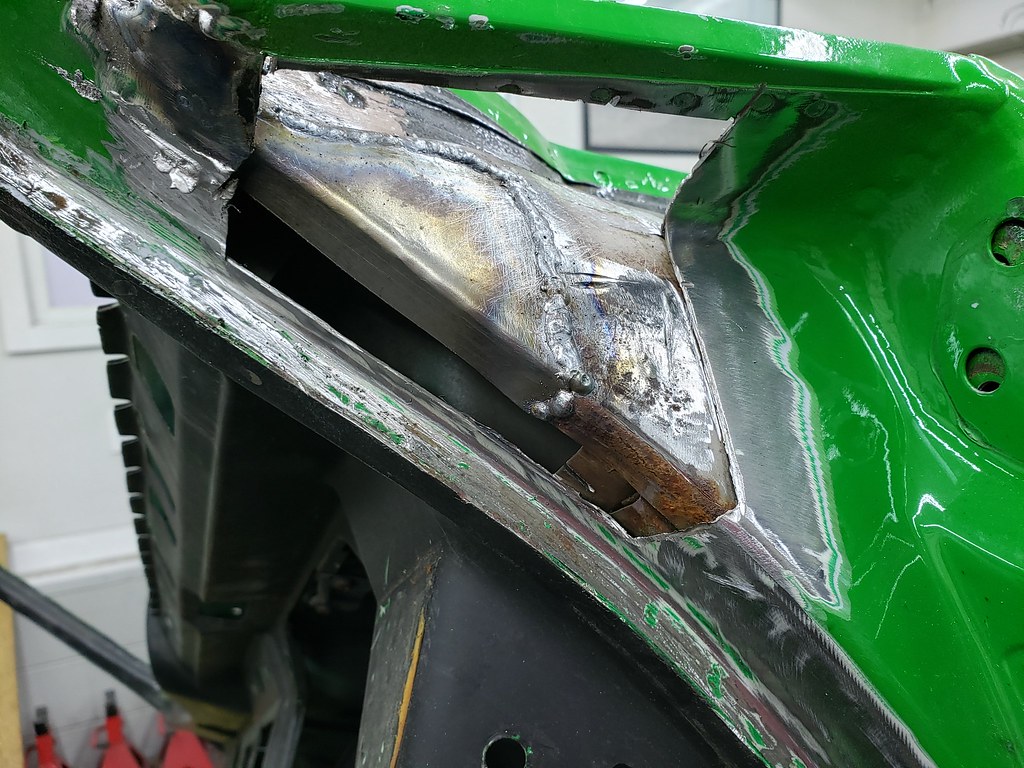


Done


So back to the rocker. After spraying the inside with some green stuff from Eastwood, I installed the heating tube.

Primed the inside of the inner rocker panel. And welded it in.


Next, a new rocker support and test fitting the outer rocker.


More to come.
Cheers
Engelbert
Here is what the looked like with the extensions.
So I removed the body filler around the flare, and taped the extension on.
Now I can make the plug for the mold.
When I did the left side I found some holes from the past, when somebody did body work.
So I welded the holes and got it straight.
Got the plug almost done.
So, I got back the the sheet metal. I know, back when I build the car for Autocross, nothing was perfect, just a racecar, LOL. So this piece comes out.
I removed careful the rocker.
So there is some work needed.
I removed the inner rocker section, this will be replaced with a new piece. Also I get better access to see what's going on in there.
I removed the bottom section of the door post.
As well a section of the inner wall.
Made a new piece and welded it in.
Then I made a new piece for the bottom of the door post.
I found some rust at the top section of the door post. So I started to look into that.
And before you know it you are deep in it, LOL.
So I just cut out bad sections, made new pieces and welded it back in.
Done
So back to the rocker. After spraying the inside with some green stuff from Eastwood, I installed the heating tube.
Primed the inside of the inner rocker panel. And welded it in.
Next, a new rocker support and test fitting the outer rocker.
More to come.
Cheers
Engelbert
LED lights for classic Porsches http://carmagic.us/
-
blueline

- Moderator
- Posts: 6098
- Joined: Mon Sep 26, 2022 12:22 pm
- Location: Middle Tennessee
- Has thanked: 4446 times
- Been thanked: 2413 times
@Carmagic
Wow! Amazing work and awesome pics.
Wow! Amazing work and awesome pics.
Tim
Current:
'26 911 Carrera S - PTS Verde British Racing Green
'24 Cayenne S - Algarve Blue Metallic
'21 718 Cayman GTS - Black
'22 911 Turbo S - Carmine Red
'21 718 Cayman GT4 - White
'11 GMC 1500 Quad Cab 4x4 - Black
Musik-Stadt Region
Current:
'26 911 Carrera S - PTS Verde British Racing Green
'24 Cayenne S - Algarve Blue Metallic
'21 718 Cayman GTS - Black
'22 911 Turbo S - Carmine Red
'21 718 Cayman GT4 - White
'11 GMC 1500 Quad Cab 4x4 - Black
Musik-Stadt Region
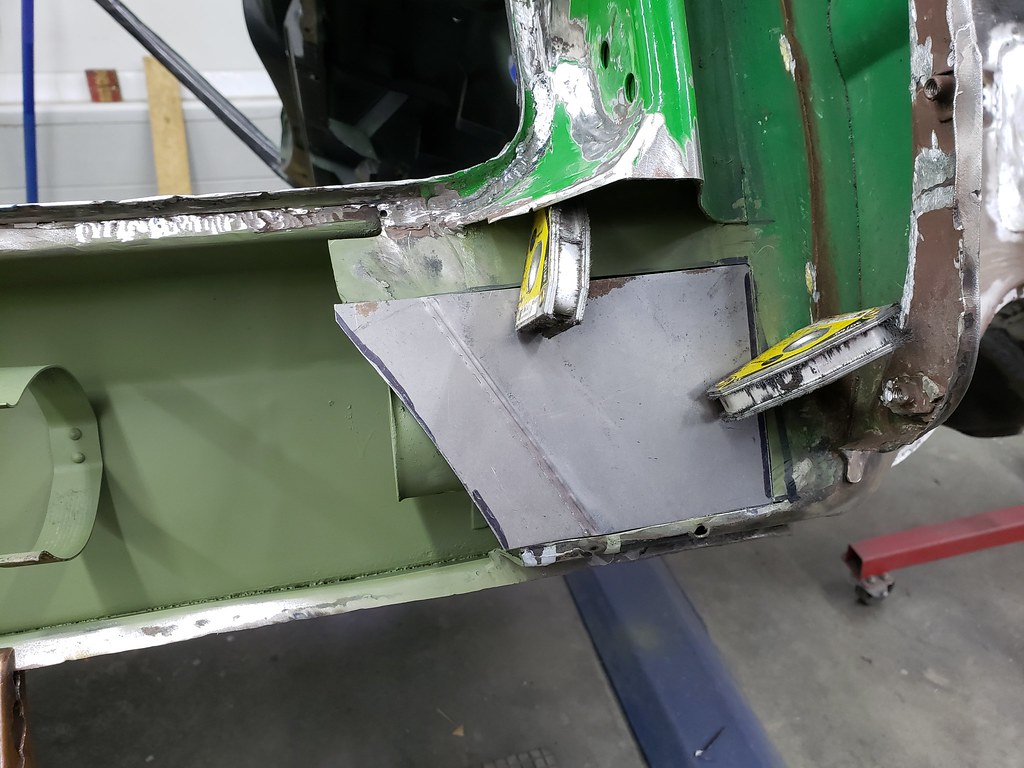
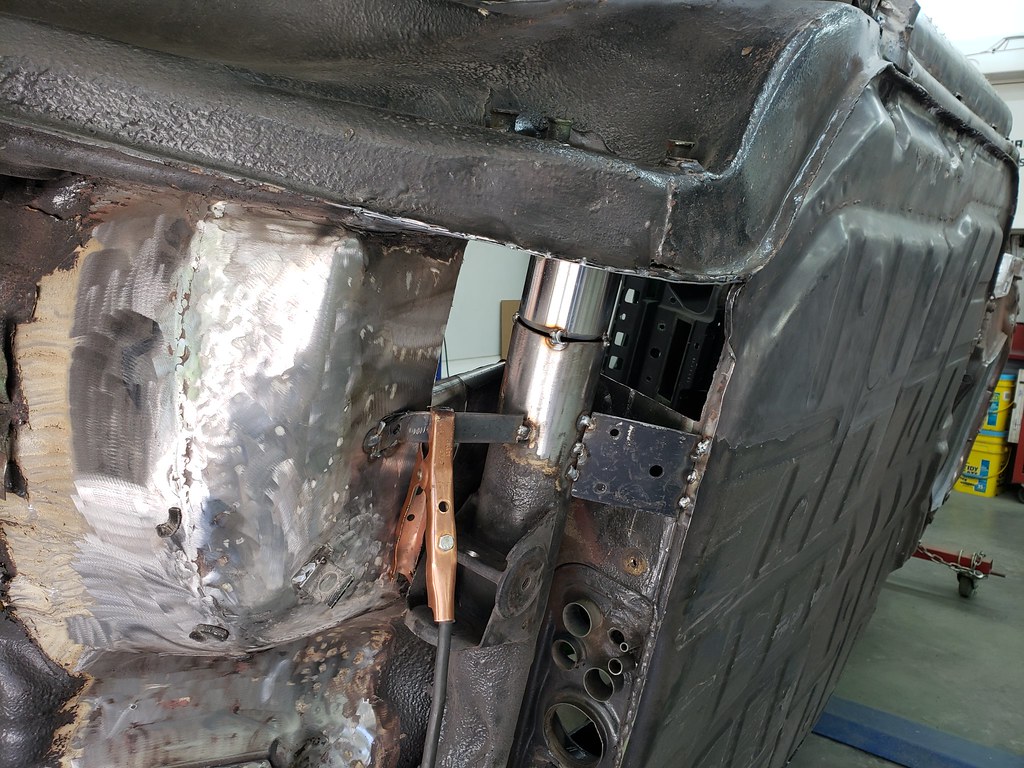
Now to the driver side with the rocker area. The old door lock support, outer and inner rocker is removed.

I checked out the lower section of the door post, and decided it must be removed.


I cut out a piece of the inner wall behind the door post bottom section.

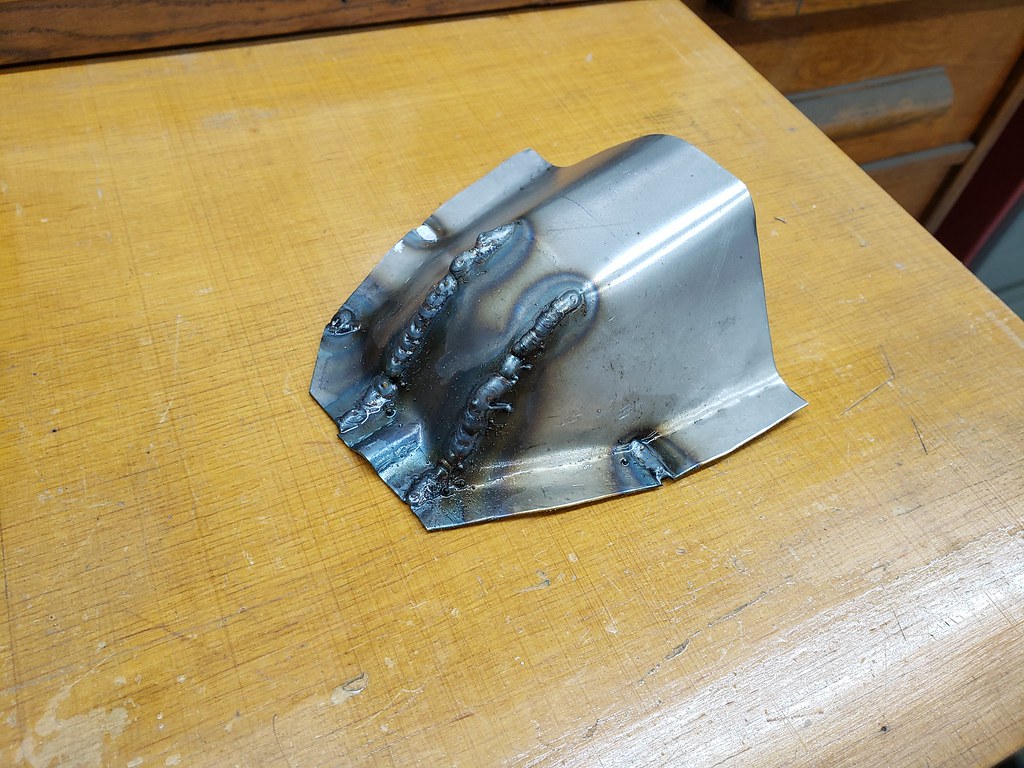
I made a new piece and welded it in.


Also made a new bottom section and welded it in.

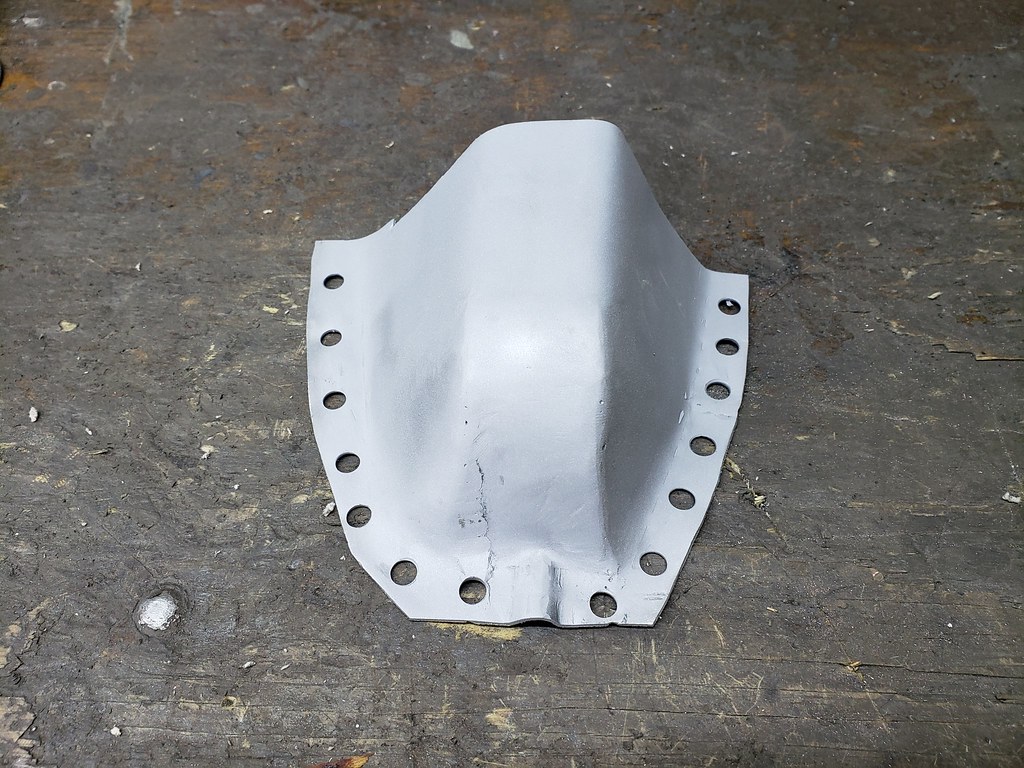
The rear section of the inner rocker needed also a new piece where the inner rocker ends.

The top section of the rear quarter needed some repair.


The heater tube end plastic pieces were falling apart, so I made some new ends with the 3D printer.


I also replaced the jack support in the left side and welded the inner rocker panel.


Here is it all finish welded.
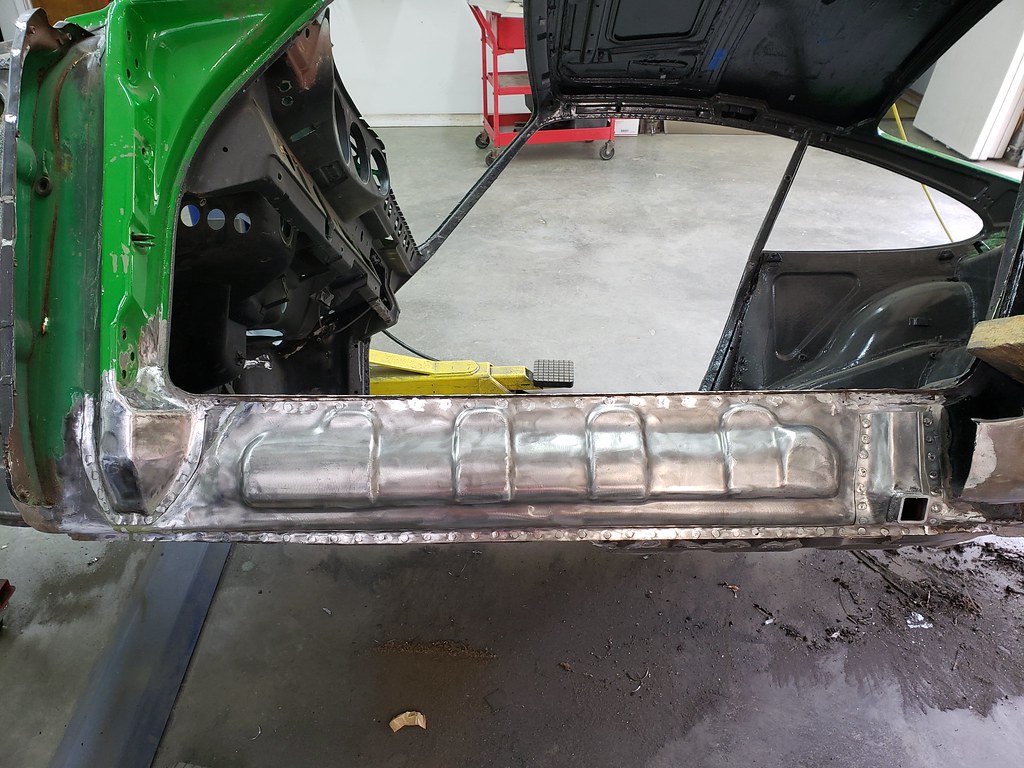

Here with the outer rocker support and some primer.

Next I will be the doors, fenders and hood to fit the outer rockers and the door lock supports.
Cheers
Engelbert
I checked out the lower section of the door post, and decided it must be removed.
I cut out a piece of the inner wall behind the door post bottom section.
I made a new piece and welded it in.
Also made a new bottom section and welded it in.
The rear section of the inner rocker needed also a new piece where the inner rocker ends.
The top section of the rear quarter needed some repair.
The heater tube end plastic pieces were falling apart, so I made some new ends with the 3D printer.
I also replaced the jack support in the left side and welded the inner rocker panel.
Here is it all finish welded.
Here with the outer rocker support and some primer.
Next I will be the doors, fenders and hood to fit the outer rockers and the door lock supports.
Cheers
Engelbert
LED lights for classic Porsches http://carmagic.us/
I mounted the doors, fenders and hood, to make sure all lines up.

Then I found something I didn't like.
The right door was worse then I expected.
There was a lot of body filler and the sheet metal under it was really bad.
So I decided to use another door I had. The good thing is that it already has the mounting hole for the right mirror.

So now that it all fits, I can finish the outer rockers and the door lock supports.


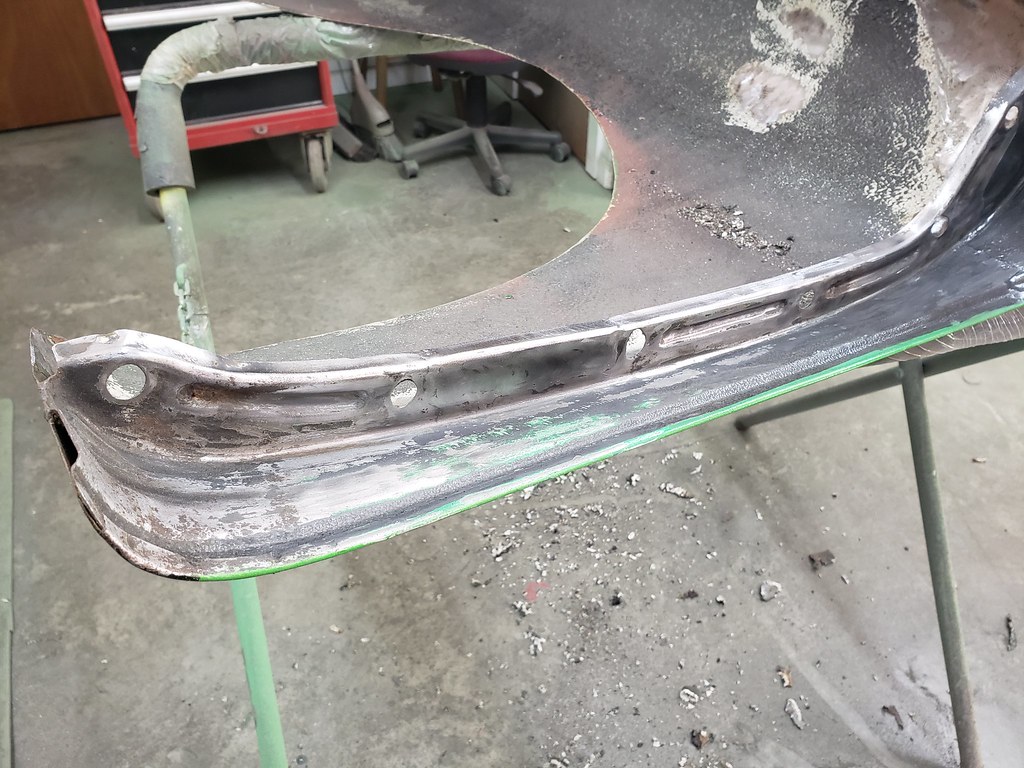
Now I started with the fenders. There was some repair need where they bolt to the body. Here are pictures of the section I welded in new pieces.


I also closed the antenna hole.

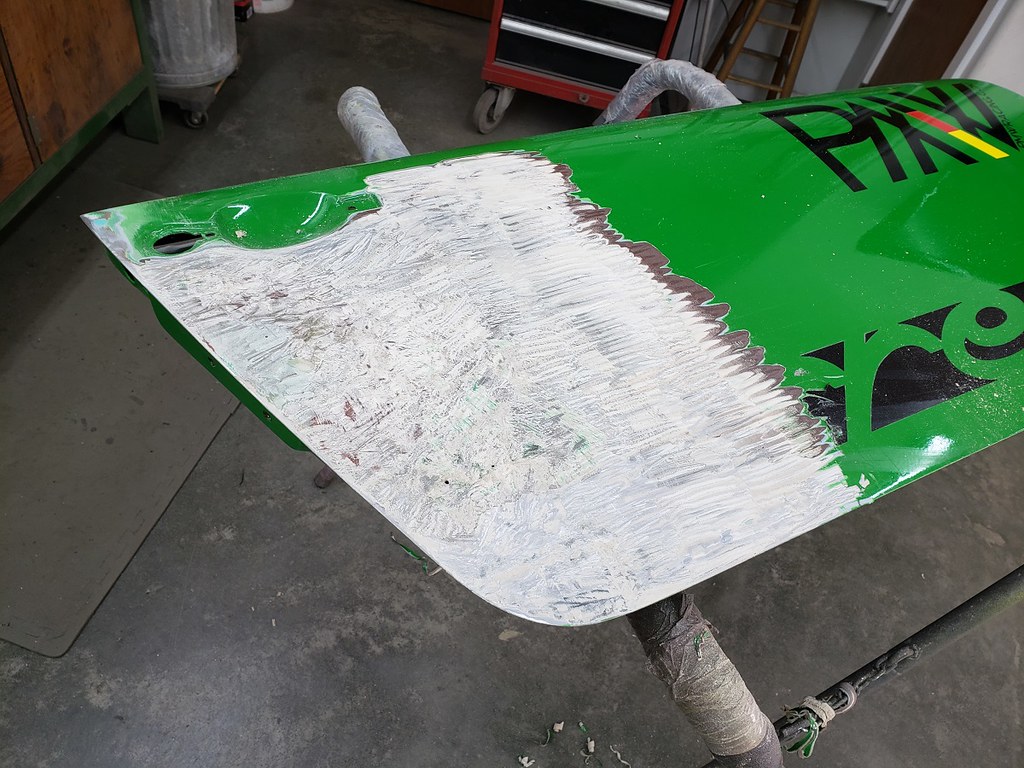
The right side fender was pretty good, but the left one had some repair many years ago. Someone filled in a big gap with fiberglass filler. I removed all this stuff so I can fix this section. I want to make this correct, so I ordered new turn signal housings seals to make sure at the end all fits nice.

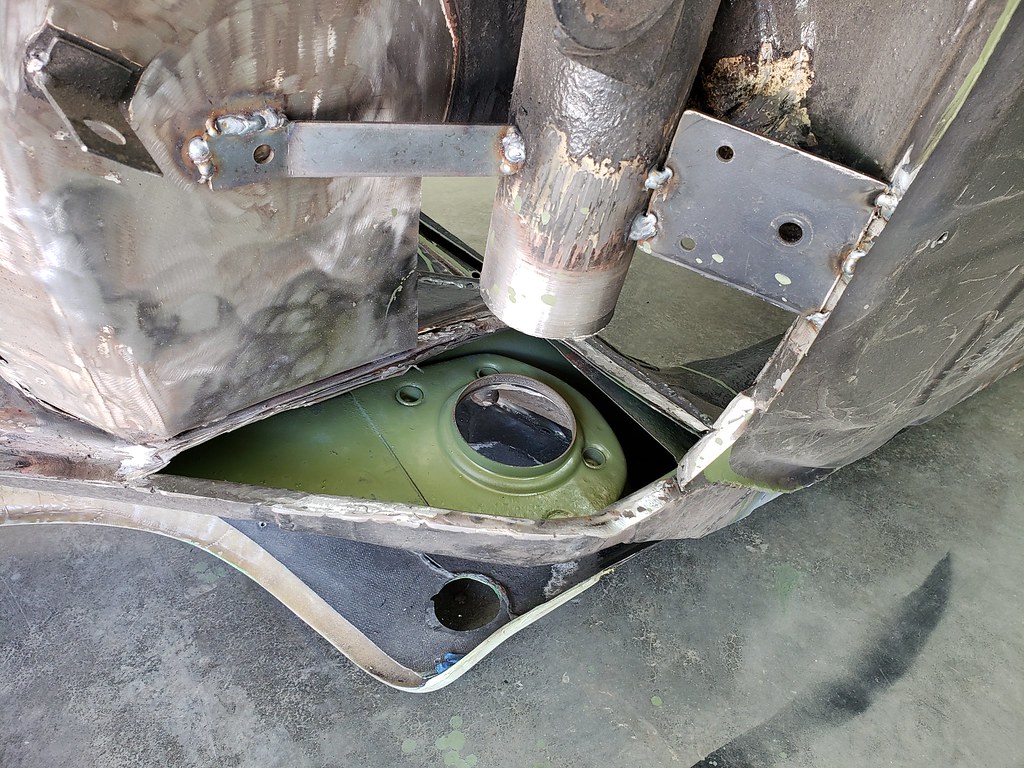
I will continue on the fender when the seals come in. I also ordered a few weeks ago 2 sleeves for the rear torsion bar sections. Since the sleeves are in I can start with that.
I started on the left side and made 2 opening so I have access for cutting and welding.


I welded some braces in, so the tube will not move when I cut the old sleeve out.

I removed all the old section and cleaned up as good as possible. Ready to fit in the new sleeve.

Making a template for the inner section.

Inner section welded in.

Now lining up the new sleeve with the t-bar and spring plate in place, so it will line up OK. Tack weld the sleeve to the tube.

Fitting the outer sheet metal. I had to make it in 2 pieces.


This should be good for another 50 years.
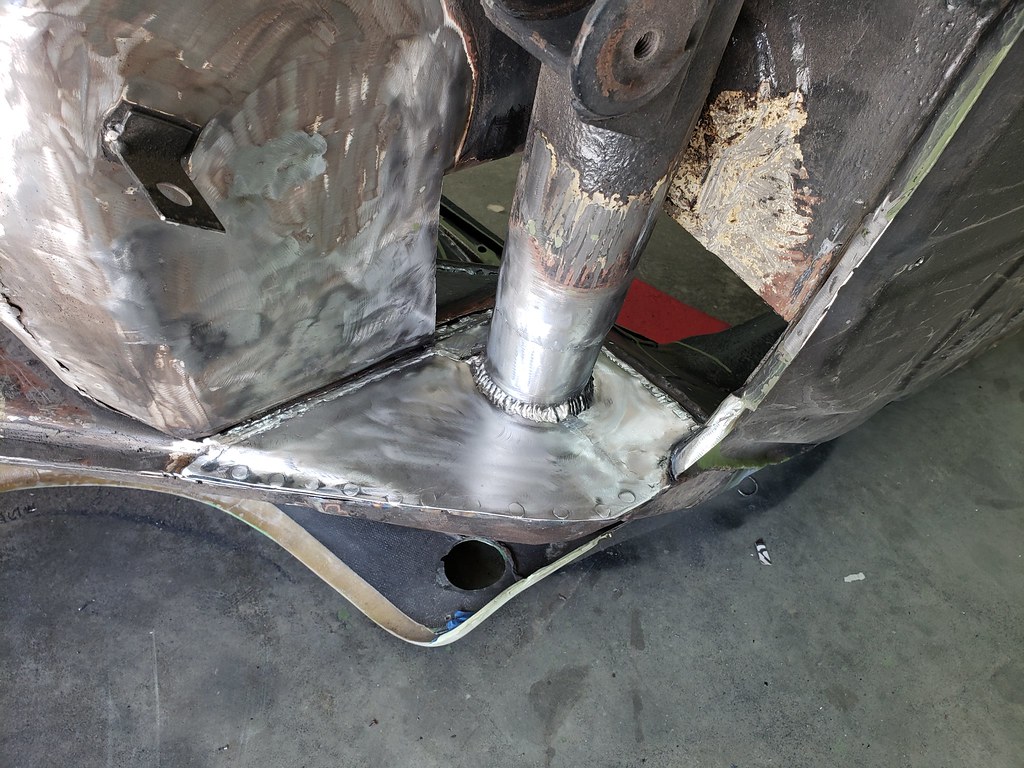

Closed the access holes and this side is done.

The same procedure for the right side.


Next I will go back to fenders.
Cheers
Engelbert
Then I found something I didn't like.
The right door was worse then I expected.
There was a lot of body filler and the sheet metal under it was really bad.
So I decided to use another door I had. The good thing is that it already has the mounting hole for the right mirror.
So now that it all fits, I can finish the outer rockers and the door lock supports.
Now I started with the fenders. There was some repair need where they bolt to the body. Here are pictures of the section I welded in new pieces.
I also closed the antenna hole.
The right side fender was pretty good, but the left one had some repair many years ago. Someone filled in a big gap with fiberglass filler. I removed all this stuff so I can fix this section. I want to make this correct, so I ordered new turn signal housings seals to make sure at the end all fits nice.
I will continue on the fender when the seals come in. I also ordered a few weeks ago 2 sleeves for the rear torsion bar sections. Since the sleeves are in I can start with that.
I started on the left side and made 2 opening so I have access for cutting and welding.
I welded some braces in, so the tube will not move when I cut the old sleeve out.
I removed all the old section and cleaned up as good as possible. Ready to fit in the new sleeve.
Making a template for the inner section.
Inner section welded in.
Now lining up the new sleeve with the t-bar and spring plate in place, so it will line up OK. Tack weld the sleeve to the tube.
Fitting the outer sheet metal. I had to make it in 2 pieces.
This should be good for another 50 years.
Closed the access holes and this side is done.
The same procedure for the right side.
Next I will go back to fenders.
Cheers
Engelbert
LED lights for classic Porsches http://carmagic.us/
-
blueline
- Moderator
- Posts: 6098
- Joined: Mon Sep 26, 2022 12:22 pm
- Location: Middle Tennessee
- Has thanked: 4446 times
- Been thanked: 2413 times
I keep saying this - broken record, I know. But just Wow. Wow x 100 (or more).
PS: thanks for sharing this process and for all the pictures. It's fascinating to see this being done and to know that there are those able to do this level of work. Dedication, knowledge, and skill. Several I've seen posting on Carpokes are extremely talented, that's for sure.
PS: thanks for sharing this process and for all the pictures. It's fascinating to see this being done and to know that there are those able to do this level of work. Dedication, knowledge, and skill. Several I've seen posting on Carpokes are extremely talented, that's for sure.
Tim
Current:
'26 911 Carrera S - PTS Verde British Racing Green
'24 Cayenne S - Algarve Blue Metallic
'21 718 Cayman GTS - Black
'22 911 Turbo S - Carmine Red
'21 718 Cayman GT4 - White
'11 GMC 1500 Quad Cab 4x4 - Black
Musik-Stadt Region
Current:
'26 911 Carrera S - PTS Verde British Racing Green
'24 Cayenne S - Algarve Blue Metallic
'21 718 Cayman GTS - Black
'22 911 Turbo S - Carmine Red
'21 718 Cayman GT4 - White
'11 GMC 1500 Quad Cab 4x4 - Black
Musik-Stadt Region